Automatic domain and SSL management
Create and maintain DNS records on Cloudflare, secure the communication to the origin servers using certificates from Let’s Encrypt, and how to make this painless and fully automated.
Automate, automate, automate! I had a fairly frictionless process for spinning up applications on new domain names, with automatic SSL certificate management. Still, there were a few manual steps at the initial setup, plus not a lot of visibility on the state and progress. Well, no more!
Starting point
In a previous post I mentioned, I use Cloudflare for content delivery and DNS management. The dynamic IP address I get from my ISP was kept up-to-date by a container with my ddclient image. Origin certificates are all coming from Let’s Encrypt using their certbot client. The HTTPS traffic is then handled by an Nginx instance, that uses these certificates. The initial setup process used to look like this for new subdomains:
- Register the new subdomain on Cloudflare’s dashboard manually (sigh…)
- Get the new Docker services running through the automated pipeline
- ddclient and the certbot helper picks up the new subdomain
- The Nginx configuration file is updated for the new endpoint, including configuration for the SSL certificate
Note: the certificate does not exist at this point, so the initial configuration reload fails (meh…) - certbot fetches the new certificate and saves it on a shared volume, so Nginx can access it
- With no events generated at this point, I have to log in to the Swarm manager node and manually send a
HUPsignal to the Nginx container (sigh…) - And now we’re in business…
- Further updates are fully automated, with ddclient keeping the IP address up-to-date on the DNS record, and certbot renewing the certificates when it’s time
One could argue, it’s not too bad, having to do only the DNS registration manually, plus a quick docker kill on an SSH session. It does mean though, that I have to actively participate in, and supervise the launch of services on a new subdomain.
So, how do I get to spin up new endpoints, with a git push only, sitting on a train, using a spotty mobile data connection, in a fully automated way? With a Python app, of course…
The present future
All of the 3rd party services and tools I mentioned above have awesome APIs and/or great support for automation. I needed a consistent workflow, involving all of them, executing steps in the right order, and notifying related services as and when needed. Half of the problem with the original process is timing issues, this is what I needed to resolve.
The new workflow is this:
- Launch the new service with a
git pushand appropriate labels in the stack YAML file - The Nginx configuration is updated, the container is signalled, but it fails to reload because of the missing certificate, so it will continue running with the previous configuration
- The domain automation service kicks off an out-of-schedule update, in response to the Docker service event
- It collects all the subdomains from the running Docker services’ labels, and processes them one by one
- It grabs the current public IP address from api.ipify.org
- Creates or updates the related DNS record in Cloudflare, using their Python API client
- Runs certbot through subprocess
- Sends a signal to containers with appropriate labels (e.g. to Nginx to reload), in case a certificate was renewed, or it was fetched for the first time
- Sends a message on Slack for errors, DNS record updates and certificate changes
- Also logs messages into my Elasticsearch-Fluentd-Kibana stack
This workflow is then repeated on a schedule, so that public IP address changes and certificate renewal happen if they need to. To reiterate, the only manual step in this process is now the git push with the code or configuration changes, like it should be. Yay!
On a related note, certbot is actually implemented in Python, but it’s designed to run from the command line with arguments, and that means, it is very difficult to use it as a library. I’m not particularly happy about executing it as an external process, but it is still better than running it on a separate schedule.
Components
It was surprisingly easy to get this working, thanks to the awesome open-source libraries available for the 3rd party services and tools. The Docker side of automation is handled by the awesome docker-py library, of course.
The ipify service is used to get the public IP address for the DNS update. It serves an impressive 30 billion requests a month, and it provides responses in JSON, JSONP and plain text format as well. It is free, open-source, and just plain awesome! I’m using it in plain text mode, with the requests Python library, like this:
ip_address = requests.get('https://api.ipify.org').text
Cloudflare has a wonderful API, accompanied with a Python SDK. This makes things super easy.
import CloudFlare
cloudflare = CloudFlare.CloudFlare()

zones = {
    zone['name']: zone
    for zone in self.cloudflare.zones.get()
}

zone = zones['example.com']
dns_records = [
    record for record in cloudflare.zones.dns_records.get(zone['id'])
    if record['type'] in ('A', 'AAAA')
]

record = dns_records[0]
cloudflare.zones.dns_records.put(
    record['zone_id'], record['id'],
    data=dict(
        name='demo.example.com',
        type='A', content='8.8.8.8',
        proxied=record['proxied']
    )
)
The snippet above would fetch the zone details for example.com, list the DNS records, take the first A or AAAA record, and update it with the IP address 8.8.8.8. See? Super easy!
certbot is also open-source, as is the underlying acme library that handles requests to the Let’s Encrypt API. certbot’s architecture is modular, and it supports plugins. I used to use the default HTTP-01 challenge, where the tool gave me a token, and I had to serve that up on HTTP, on the domain I was verifying. This was done using Nginx with a shared volume for saving the challenge content, and it was working OK. I found another way that is much better for me though. The DNS-01 challenge needs you to have a TXT DNS record set up with the challenge content, so that Let’s Encrypt can verify your domain by checking it. This is very easy to do on Cloudflare using their APIs. Would I code it up? Absolutely. Do I have to? Nope. The Cloudflare DNS Authenticator plugin is doing exactly this. All I need to do is to make sure the plugin is available.
$ pip install certbot-dns-cloudflare
With this, I can now pass settings to certbot to do the challenge and verification through Cloudflare:
$ certbot certonly -n --keep    \
    -d subdomain.example.com    \
    --dns-cloudflare            \
    --dns-cloudflare-credentials cf_credentials.ini \
    --dns-cloudflare-propagation-seconds 15         \
    --email user@home.com --agree-tos
Most of the parameters are pretty self-explanatory. We ask for the specific DNS-01 challenge, agree to the terms of service and pass our email address. The --dns-cloudflare-propagation-seconds 15 flag allows 15 seconds for DNS propagation after the new TXT record is in place, and certbot only starts the verification after this. On completion, either by failing or succeeding, the DNS record is removed by the plugin automatically. Nice one!
The Slack notification is done through their excellent API. Again, I didn’t have to write the API communication layer myself, the slackclient library takes care of it for me. Sending a message is as easy as:
from slackclient import SlackClient

client = SlackClient(token)
client.api_call(
    'chat.postMessage',
    channel='example',
    text='Hello world!'
)
You pass in your token, the library does the authentication, then you can post as many messages as you wish, within reason.
Signalling the containers I need is a bit tricky. The domain automation app has to run on a Swarm manager node, so that it has access to the Docker API, including the service related endpoints. You can’t signal services or their tasks directly, only individual containers, which might not run on the same node where the app is running. To get around the problem, I’m launching a new global service with the same image that the app uses, and I specify a different launch command, that will only execute the local signal send, not the main application (see the code here). The service is set to never restart, so each of its tasks only runs once, then stops. The command line equivalent of this would be something like this:
$ docker service create         \
    --mode global               \
    --restart-condition none    \
    --restart-max-attempts 0    \
    rycus86/domain-automation   \
    python /app/notifications/docker_signal.py \
        --label domain.automation.signal
In the Python component, the final task states are collected, along with the standard output and error messages, when available. I’m using the awesome Fluentd logging driver, so the messages will be available in Kibana, in case I have to check what happened.
The application logs themselves are also going into Elasticsearch through Fluentd. This is easily done by changing the logging.driver in the stack’s Composefile.
version: '3.5'
services:

  domain-automation:
    image: rycus86/domain-automation
    logging:
      driver: "fluentd"
      options:
        fluentd-address: 192.168.15.25:24224
        fluentd-async-connect: 'true'
        fluentd-sub-second-precision: 'true'
        tag: app.domain.automation
I mentioned above, that the trigger and configuration for the Docker bits live in service and container labels in the stack YAML. For example, if I’d have an nginx service to signal, and two other services to manage the subdomains for, it would look something like this:
version: '3.5'
services:

  nginx:
    image: nginx
    labels:
      - domain.automation.signal=HUP

  demo:
    image: rycus86/demo-site
    deploy:
      labels:
        - discovery.domain.name=demo.viktoradam.net

  blog:
    image: ghost
    deploy:
      labels:
        - discovery.domain.name=blog.viktoradam.net
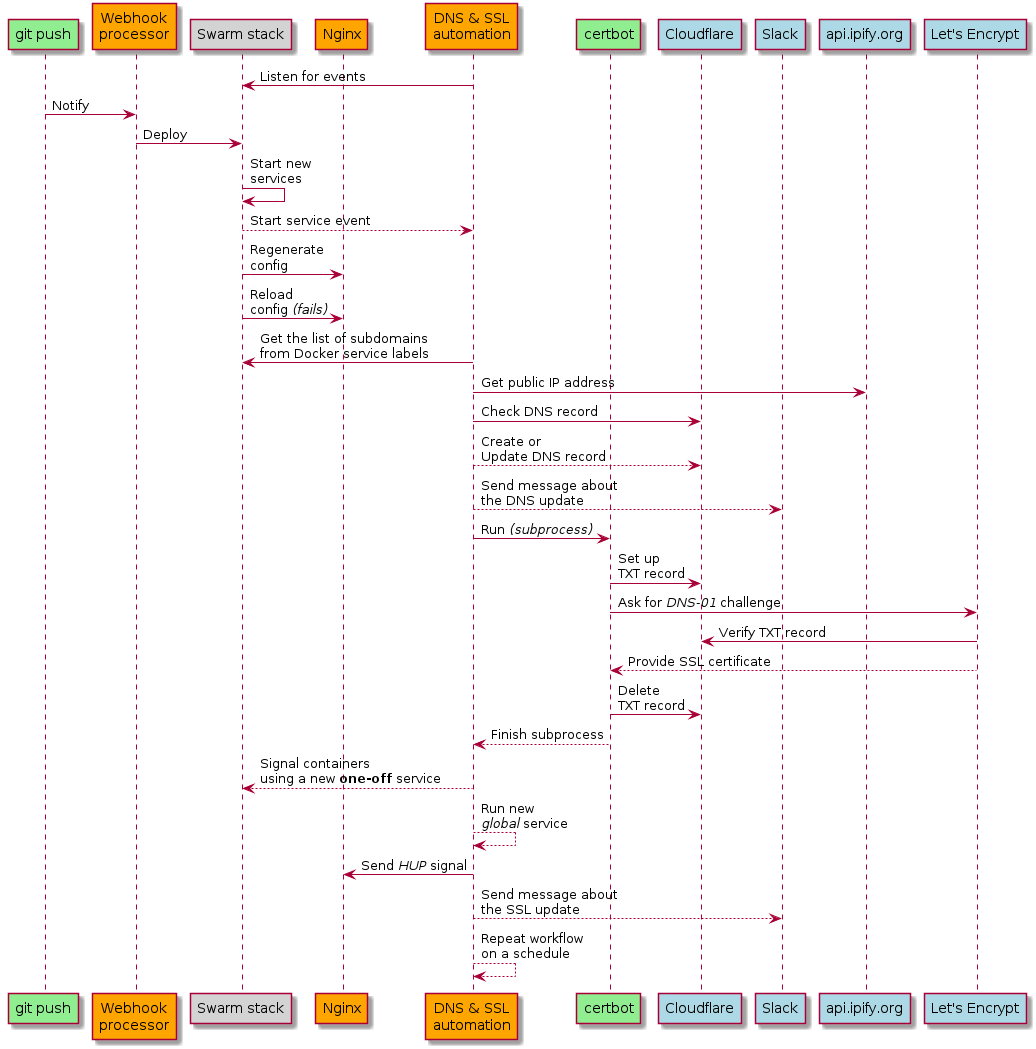
Finally, if you’re more of a visual type of person, this is how the workflow looks like again, drawn using the brilliant PlantUML.
Wrap up
I am now testing this tool in my Home Lab, and if all works out, it will replace the ddclient and certbot services, plus the related plumbing, with all the tasks that come with them – a total of 10 containers. It is a nice save of resources, too!
I have also started open-sourcing all my Docker stack configuration, starting with the DNS/SSL management stack. Eventually, I want to have them all on GitHub, so its easier to manage, demonstrate and write about them. If you’re checking, don’t worry about the .conf files, the contents are encrypted using git-crypt, which is an awesome tool, doing automatic, transparent encryption and decryption of files that match the patterns defined in the .gitattributes file. You know, for sensitive stuff.
Hope you enjoyed this post, and it got you inspired to start building the automation around your own stack. I’m absolutely happy for you to use my app and its Docker image, and I’m also willing to accept pull-requests on the GitHub repo, if all you’re missing is another DNS or SSL management module.
If you’re going down these routes and want to get in touch, find me on Twitter @rycus86!
Happy hacking!