Moving home: To AWS with EC2, Lambda, API Gateway and Cloudflare for free
It was time for me to pack up my home stack and look for a free (even if temporary) - cloud hosting for it until we go through an actual home move as well.
Background
I was lucky enough to get a job offered at a fantastic company I’m super excited about, and it’s only about ten thousand miles (or 17k kilometers) from where we live. While we move halfway across the world, my self-hosted services and their servers need to either move or be offline. I have started looking for cloud providers with an easy to setup solution I could use for free until I’m ready to move things back to my own devices. I have finally settled for the AWS free tier services I was more-or-less familiar with already to some extent, and Terraformed my home lab into a data center only five thousand miles (or 8k kilometers) away from where it used to run.
This post is about changing infrastructure configuration from YAML files to HCL, and rolling these changes out with zero downtime, though also sacrificing some of the services in the process.
Getting familiar with AWS
First, I looked at the offerings of the big, main cloud providers to see where could I host a couple of services running in Docker. Each of them had pretty decent and cheap options for running a single virtual machine instance, but I thought I’ll have a look at the obvious choice, AWS and its free tier. It comes with a lot of services with basic options free for the first 12 months, and since I had a little bit of experience with it, I gave it a go.
The first thing I wanted to try was running a t2.micro EC2 instance and install Docker on it, to see if that works as easily as it should be, and it did. I chose Ubuntu as the AMI, fired it up and tested the SSH connection. On the VM itself, I just installed Docker with a simple one-liner.
$ curl -fsSL get.docker.com | sh
Did a quick docker version afterwards, and I saw that it’s all good so far. In the meantime, I was working on the target stack locally, with a Traefik reverse proxy for routing and automatic Let’s Encrypt certificate management, this Ghost blog, and an Nginx instance for redirecting the domains I won’t maintain while I move. Then I started to think that this is a bit crazy, and I could do something more AWS-native for this last part.
I already had some Lambda and API Gateway experience from work, and I thought this would make much more sense to send simple redirects. And when I say simple, this is what my Lambda handler looks like.
exports.handler = async (event, context, callback) => {
    callback(null, {
        statusCode: 302,
        headers: {
            "Location": "https://blog.viktoradam.net"
        },
        body: null
    });
}
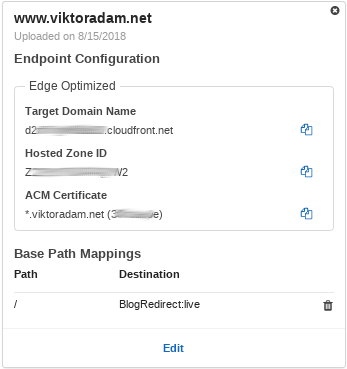
I created the Lambda function on the AWS Console, and configured an integration for it with API Gateway. This takes care of the appropriate configuration that connects incoming HTTP requests to the handler function, attaches the necessary policies and integrations with logs and metrics, etc. After this, I wanted to route all requests from my www.viktoradam.net domain to this integration, which needed configuring a custom domain for API Gateway. That in turn needs a certificate, so I went to Cloudflare, my CDN provider, and generated a new origin certificate. I saved the certificate and key files, plus grabbed the Cloudflare origin CA root, and uploaded the certificate into ACM. Now I was able to set up the custom domain mapping, using the domain name and the uploaded certificate. I wanted this domain to handle all requests to any path with the Lambda function I created previously, so I set the base path mapping to use the API created earlier with its default stage for all requests - just leave the Path empty for this.
The endpoint was now almost ready, AWS estimated it takes about 40 minutes to roll it out globally. I started testing the CloudFront domain that was generated for this setup with a simple cURL request.
$ curl -s -v -H 'Host: www.viktoradam.net' https://d1234abcd.cloudfront.net/ > /dev/null
Once it started working, I was ready to change the DNS record in Cloudflare. While self-hosting this endpoint, it had an A record, with the IP address pointing to my origin server. With this CloudFront setup, you’ll need a CNAME record, where the value is the domain name AWS gives you in the Target Domain Name field of the API custom domain.
After a few seconds, the domain was now pointing to AWS, and after a quick Cloudflare cache purge, it was ready for testing.
$ curl -s -v https://www.viktoradam.net/ > /dev/null
I went on then to hook up two more subdomains to this integration before I realized that manually setting the whole thing up is not the way to go. I need something repeatable and codified, so it’s easy to redo if I mess something up, or forget how I did a particular bit of configuration before.
Configuration as code
When I think about declarative AWS infrastructure configuration, Terraform and CloudFormation comes to my mind immediately. I haven’t tried CloudFormation yet, but I did have some experience with Terraform for a similar setup, so I went with that one. I quickly rebuilt the VS code image I use for developing this stack, based on jess/vscode, and added the Terraform binary in there. I added the basic configuration then to be able to initialize the workspace.
variable "region" {}
variable "account_id" {}

terraform {
  backend "local" {
    path = "state/terraform.tfstate"
  }
}

provider "aws" {
  region = "${var.region}"
}
Now I was ready to run terraform init that downloads the plugins for the providers it can find in the .tf files, in my case, for AWS. Next, I prepared the JavaScript file for the Lambda function body in a subfolder, and wrote a simple Shell script to zip it, Terraform will want to upload it in this format. Once I had the .zip file, I prepared the HCL for the function with a different name, so it wouldn’t clash with the manually created one. The source_code_hash makes sure that the function code is changed on AWS when the contents change.
data "aws_iam_role" "lambda_basic_execution" {
  name = "lambda_basic_execution"
}

resource "aws_lambda_function" "lambda_blog_redirect" {
  function_name    = "BlogRedirect"
  filename         = "lambda/blog_redirects.zip"
  source_code_hash = "${base64sha256(file("lambda/blog_redirects.zip"))}"
  handler          = "blog_redirects.handler"
  runtime          = "nodejs8.10"
  role             = "${data.aws_iam_role.lambda_basic_execution.arn}"
}
OK, I gave it a go with terraform plan, to see what it would do, then quickly realized that I haven’t given any AWS API keys to it yet, so it couldn’t really do anything. The AWS provider can take its credentials from a few different places, one of them being a configuration file like the one below, and Terraform looks for it by default at the ~/.aws/credentials path.
[default]
aws_access_key_id = abcABC123
aws_secret_access_key = xyzXYZ456
I just had to quickly create a new user for programmatic access in IAM, then saved the access and secret keys in the file above. Now terraform plan looked much happier. With plan, it prints the changes it would need to do, compared to the state it already manages, which was empty for me at this point. To actually execute the plan and create the resources, use terraform apply. The apply sub-command will provision the changes, and save the results in a state file, which will then be used on subsequent runs to compute the difference Terraform should resolve.
Lambda was easy to set up, API Gateway is much more cumbersome unfortunately. I tried to follow the Serverless guide on the Terraform documentation site, but it didn’t actually work. Some GitHub issues suggest it needs some updating, but I could finally get it working with configuration like this below.
# The API to configure
resource "aws_api_gateway_rest_api" "apigw_rest_blog" {
  name        = "BlogRedirect"
  description = "Redirects all request to the blog"
}

# The API resource for handling all requests
resource "aws_api_gateway_resource" "apigw_blog_resource" {
  rest_api_id = "${aws_api_gateway_rest_api.apigw_rest_blog.id}"
  parent_id   = "${aws_api_gateway_rest_api.apigw_rest_blog.root_resource_id}"
  path_part   = "{proxy+}"
}

# The HTTP method config below for /* request paths
resource "aws_api_gateway_method" "apigw_blog_method_GET" {
  rest_api_id   = "${aws_api_gateway_rest_api.apigw_rest_blog.id}"
  resource_id   = "${aws_api_gateway_resource.apigw_blog_resource.id}"
  http_method   = "GET"
  authorization = "NONE"
}

resource "aws_api_gateway_method_response" "apigw_blog_method_200" {
  rest_api_id = "${aws_api_gateway_rest_api.apigw_rest_blog.id}"
  resource_id = "${aws_api_gateway_resource.apigw_blog_resource.id}"
  http_method = "${aws_api_gateway_method.apigw_blog_method_GET.http_method}"
  status_code = "200"

  # effectively turn off response model validation
  response_models = {
    "application/json" = "Empty"
  }
}

resource "aws_api_gateway_integration" "apigw_blog_integration" {
  rest_api_id = "${aws_api_gateway_rest_api.apigw_rest_blog.id}"
  resource_id = "${aws_api_gateway_method.apigw_blog_method_GET.resource_id}"
  http_method = "${aws_api_gateway_method.apigw_blog_method_GET.http_method}"

  integration_http_method = "POST"
  type                    = "AWS_PROXY"
  uri                     = "${aws_lambda_function.lambda_blog_redirect.invoke_arn}"
}

resource "aws_api_gateway_integration_response" "apigw_blog_integration_response"
{
  rest_api_id = "${aws_api_gateway_rest_api.apigw_rest_blog.id}"
  resource_id = "${aws_api_gateway_resource.apigw_blog_resource.id}"
  http_method = "${aws_api_gateway_method.apigw_blog_method_GET.http_method}"
  status_code = "${aws_api_gateway_method_response.apigw_blog_method_200.status_co
de}"

  # effectively turn off response model validation
  response_templates = {
    "application/json" = ""
  }
}

# The HTTP method config below for / (root) request paths
resource "aws_api_gateway_method" "apigw_blog_method_root_GET" {
  rest_api_id   = "${aws_api_gateway_rest_api.apigw_rest_blog.id}"
  resource_id   = "${aws_api_gateway_rest_api.apigw_rest_blog.root_resource_id}"
  http_method   = "GET"
  authorization = "NONE"
}

resource "aws_api_gateway_method_response" "apigw_blog_method_root_200" {
  rest_api_id = "${aws_api_gateway_rest_api.apigw_rest_blog.id}"
  resource_id = "${aws_api_gateway_rest_api.apigw_rest_blog.root_resource_id}"
  http_method = "${aws_api_gateway_method.apigw_blog_method_root_GET.http_method}"
  status_code = "200"

  # effectively turn off response model validation
  response_models = {
    "application/json" = "Empty"
  }
}

resource "aws_api_gateway_integration" "apigw_blog_root_integration" {
  rest_api_id = "${aws_api_gateway_rest_api.apigw_rest_blog.id}"
  resource_id = "${aws_api_gateway_method.apigw_blog_method_root_GET.resource_id}"
  http_method = "${aws_api_gateway_method.apigw_blog_method_root_GET.http_method}"

  integration_http_method = "POST"
  type                    = "AWS_PROXY"
  uri                     = "${aws_lambda_function.lambda_blog_redirect.invoke_arn}"
}

resource "aws_api_gateway_integration_response" "apigw_blog_root_integration_response" {
  rest_api_id = "${aws_api_gateway_rest_api.apigw_rest_blog.id}"
  resource_id = "${aws_api_gateway_method.apigw_blog_method_root_GET.resource_id}"
  http_method = "${aws_api_gateway_method.apigw_blog_method_root_GET.http_method}"
  status_code = "${aws_api_gateway_method_response.apigw_blog_method_root_200.status_code}"

  # effectively turn off response model validation
  response_templates = {
    "application/json" = ""
  }
}

# The deployment configuration of the API
resource "aws_api_gateway_deployment" "apigw_blog_deployment" {
  # recreate the deployment when the integrations change
  depends_on = [
    "aws_api_gateway_integration.apigw_blog_integration",
    "aws_api_gateway_integration.apigw_blog_root_integration",
  ]

  rest_api_id = "${aws_api_gateway_rest_api.apigw_rest_blog.id}"
  stage_name  = "live"
}

# Finally the permission to invoke Lambda functions
resource "aws_lambda_permission" "apigw_blog_permission" {
  statement_id  = "AllowAPIGatewayInvoke"
  action        = "lambda:InvokeFunction"
  function_name = "${aws_lambda_function.lambda_blog_redirect.arn}"
  principal     = "apigateway.amazonaws.com"
  source_arn    = "${aws_api_gateway_deployment.apigw_blog_deployment.execution_arn}/*/*"
}
This configured everything, up to the CloudFront URL that triggers the execution, which you can try with a simple curl command. To make things easier, you can configure this URL as an output in Terraform, so that after successful runs, it prints its value to the console.
output "blog_redir_base_url" {
  value = "${aws_api_gateway_deployment.apigw_blog_deployment.invoke_url}"
}
The only missing bit was the custom domain mapping, and hooking it all up to Cloudflare.
Switching DNS
Terraform supports the Cloudflare provider, that lets you manage DNS records, page rules, load balancer settings, and other configuration. It will need the email address and the access token for the API access, which you can give Terraform as environment variables.
$ export CLOUDFLARE_EMAIL=abc@def.xx
$ export CLOUDFLARE_TOKEN=xyz1234efefef
What I needed here was, to be able to set the DNS records for my API Gateway endpoints to the CloudFront domain name with CNAME type. At this point, I already had a couple of subdomains manually configured, so I had a look on how to connect Terraform with Cloudflare, and import the existing settings. For this resource type, terraform import needs the zone name and the ID of the record in Cloudflare. This can be found with the following command for example.
$ export ZONE_ID=abcdef1234
$ curl https://api.cloudflare.com/client/v4/zones/${ZONE_ID}/dns_records \
        -H "X-Auth-Email: $CLOUDFLARE_EMAIL"  \
        -H "X-Auth-Key: $CLOUDFLARE_TOKEN"    \
        -H "Content-Type: application/json" | jq .
Now I needed the actual HCL configuration for them.
variable "cloudflare_zone" {
  default = "viktoradam.net"
}

# The origin certificate uploaded earlier
data "aws_acm_certificate" "all_domains_cert" {
  domain   = "*.viktoradam.net"
  statuses = ["ISSUED"]
  provider= "aws.us-east-1"
}

resource "aws_api_gateway_domain_name" "apigw_domain_www" {
  domain_name     = "www.viktoradam.net"
  certificate_arn = "${data.aws_acm_certificate.all_domains_cert.arn}"
}

resource "cloudflare_record" "cf_record_www" {
  domain  = "${var.cloudflare_zone}"
  name    = "www"
  value   = "${aws_api_gateway_domain_name.apigw_domain_www.cloudfront_domain_name}"
  type    = "CNAME"
  proxied = "true"
}

resource "aws_api_gateway_domain_name" "apigw_domain_api" {
  domain_name     = "api.viktoradam.net"
  certificate_arn = "${data.aws_acm_certificate.all_domains_cert.arn}"
}

resource "cloudflare_record" "cf_record_api" {
  domain  = "${var.cloudflare_zone}"
  name    = "api"
  value   = "${aws_api_gateway_domain_name.apigw_domain_api.cloudfront_domain_name}"
  type    = "CNAME"
  proxied = "true"
}
And finally, I was ready to import them into the local Terraform state.
$ terraform import cloudflare_record.cf_record_www viktoradam.net/abcd1234
$ terraform import cloudflare_record.cf_record_api viktoradam.net/xyz01234
A quick terraform plan showed that everything looks fine, there weren’t any differences between the configuration and the state. Next, I tried pointing another domain to the same integration. First, I needed the AWS configuration that makes the new CloudFront subdomain available.
resource "aws_api_gateway_domain_name" "apigw_domain_demo" {
  domain_name     = "demo.viktoradam.net"
  certificate_arn = "${data.aws_acm_certificate.all_domains_cert.arn}"
}

resource "aws_api_gateway_base_path_mapping" "apigw_base_path_blog_demo" {
  api_id      = "${aws_api_gateway_rest_api.apigw_rest_blog.id}"
  stage_name  = "${aws_api_gateway_deployment.apigw_blog_deployment.stage_name}"
  domain_name = "${aws_api_gateway_domain_name.apigw_domain_demo.domain_name}"
}
At this point, I haven’t added the Cloudflare configuration yet, because the new domain takes up to about 40 minutes to be available, though in my tests, it started working in about 10 minutes. Once a simple curl test succeeded, I could add in the missing bits for the DNS record change.
resource "cloudflare_record" "cf_record_demo" {
  domain  = "${var.cloudflare_zone}"
  name    = "demo"
  value   = "${aws_api_gateway_domain_name.apigw_domain_demo.cloudfront_domain_name}"
  type    = "CNAME"
  proxied = "true"
}
I had to import this new resource into the local Terraform state, then a terraform plan showed that it would change the type from A to CNAME, and the value from an origin IP address to the new domain name we’ve got from CloudFront. This looked all right, so I applied the change with terraform apply.
Moving Ghost
The next step was to move the Ghost instance that powers this blog to the EC2 instance I had running already. Now that I was able to do the redirects with Lambda functions, I could drop Nginx from the stack, and just go with a simple Traefik plus Ghost setup.
version: '3.7'
services:

  router:
    image: traefik:1.6.5
    env_file: ./cloudflare.env
    deploy:
      update_config:
        parallelism: 1
        order: start-first
      resources:
        limits:
          memory: 48M
    ports:
      - 443:443
    volumes:
      - ./traefik.toml:/etc/traefik/traefik.toml:ro
      - traefik-certs:/etc/traefik/acme
    logging:
      driver: 'json-file'
      options:
        max-size: 25m

  blog:
    image: ghost:1.22.8
    deploy:
      update_config:
        parallelism: 1
        order: start-first
      resources:
        limits:
          memory: 256M
    environment:
      - url=https://blog.viktoradam.net
      - caching__frontend__maxAge=900
    volumes:
      - ghost-data:/var/lib/ghost/content/data:nocopy
      - ghost-images:/var/lib/ghost/content/images:nocopy
      - ghost-themes:/var/lib/ghost/content/themes:nocopy
    logging:
      driver: 'json-file'
      options:
        max-size: 25m

volumes:
  ghost-data:
  ghost-images:
  ghost-themes:
  traefik-certs:
I carefully encrypted the sensitive files with git-crypt, and uploaded the project into a private repository in BitBucket. On the EC2 instance, I had to install git-crypt, clone the repository, then import the secret key and unlock the files. I was ready to try it, but to test it first, I switched over to the staging Let’s Encrypt endpoint to get a testing certificate. For the domain verification step, a new Cloudflare DNS record is added automatically, and Traefik gets access to the API with the credentials passed in with the env_file.
defaultEntryPoints = ["https"]

[accesslog]

[entryPoints]
  [entryPoints.https]
  address = ":443"
    [entryPoints.https.tls]

[acme]
email = "email@for-acme.com"
storage = "/etc/traefik/acme/acme.json"
entryPoint = "https"
acmeLogging = true
caServer = "https://acme-staging-v02.api.letsencrypt.org/directory"
onHostRule = false
  [acme.dnsChallenge]
  provider = "cloudflare"
  delayBeforeCheck = 30

[[acme.domains]]
  main = "blog.viktoradam.net"

[frontends]
  [frontends.ghost]
  backend = "ghost"
    [frontends.ghost.routes.main]
    rule = "Host:blog.viktoradam.net"

[backends]
  [backends.ghost]
    [backends.ghost.servers.server1]
    url = "http://blog:2368"

[file]
This configuration makes Traefik listen only on the HTTPS endpoint, the only one I need, then route every request on the blog.viktoradam.net domain to the ghost backend instance. It was time to start the services, and see what happens. I used Docker Swarm instead of Compose, because I had existing configuration for it, and there isn’t much downside to staying on it.
$ docker swarm init
Swarm initialized: current node (vny3efwscsqv0tbc47gm9foit) is now a manager.

To add a worker to this swarm, run the following command:

    docker swarm join --token SWMTKN-1-01813iv2h4v234bk-2937432jk42kj4b23k 192.168.9.72:2377

To add a manager to this swarm, run 'docker swarm join-token manager' and follow the instructions.

$ docker stack deploy -c stack.yml aws
...
$ docker service ls
ID                  NAME                    MODE                REPLICAS            IMAGE                                     PORTS
i1vt4iu683v2        aws_blog                replicated          1/1                 ghost:1.22.8
nuncmk34ezov        aws_router              replicated          1/1                 traefik:1.6.5                             *:443->443/tcp
This looked OK, both services were up and running. My DNS record was still pointing to my own servers, so I could test this only by pointing to the EC2 instance’s public IP directly.
$ curl -k -s -v -H 'Host: blog.viktoradam.net' https://9.8.7.6/ > /dev/null
...
> GET / HTTP/2
> Host: blog.viktoradam.net
> User-Agent: curl/7.61.0
> Accept: */*
>
...
< HTTP/2 200
< cache-control: public, max-age=900
< content-type: text/html; charset=utf-8
< date: Sat, 25 Aug 2018 12:31:22 GMT
< etag: W/"73af-NO8tANLZz6/wHX9AzNT8rPfNN2g"
< vary: Accept-Encoding
< x-powered-by: Express
<
...
Great, I now had a vanilla Ghost running on EC2, so I could start moving the data and configuration to it. These live in Docker volumes I attached to the service, and those volumes were created by the docker stack deploy command. I needed to replace the contents of them with the data I had from my running, self-hosted blog. First, I needed to stop the container on EC2.
$ docker service update aws_blog --replicas 0
This keeps the service definition and related volumes in Docker Swarm, but scales its tasks down to zero, effectively stopping any running instances. I was ready to copy my local data to EC2 now, so I used tar locally to get a single, compressed package of the SQLite database, the images and the theme folder each, then sent them to the target with scp.
#!/usr/bin/env sh
#
# Can be used as:
#   scp-to-aws /local/file /remote/file

scp -i ~/.ssh/aws-ec2.pem $1 user@55.54.53.52:$2
Now I just had to move this data to its place, into the existing Docker volumes. You can find the location of the volume data folder on the host file system easily.
$ docker volume ls
DRIVER              VOLUME NAME
local               aws_ghost-data
local               aws_ghost-images
local               aws_ghost-themes
local               aws_traefik-certs
$ docker volume inspect aws_ghost-data
[
    {
        "CreatedAt": "2018-08-22T20:04:46Z",
        "Driver": "local",
        "Labels": {
            "com.docker.stack.namespace": "aws"
        },
        "Mountpoint": "/var/lib/docker/volumes/aws_ghost-data/_data",
        "Name": "aws_ghost-data",
        "Options": null,
        "Scope": "local"
    }
]
$ cd /var/lib/docker/volumes/aws_ghost-data/_data
$ ls
ghost.db
Note, that you’ll likely need root to access the contents of this directory. A quick tar xzvf, and I was ready to start the blog with the same content I had locally. After a docker service update aws_blog --replicas 1, Ghost was online, and I could test how it looks by changing my local /etc/hosts file to use the EC2 public IP address for the domain. Everything looked all right, so I just needed the last missing bit in the Terraform config. First, I needed to register the EC2 instance in it.
data "aws_instance" "blog" {
  instance_id = "i-12345abcd"

  filter {
    name   = "image-id"
    values = ["ami-98765xyz"]
  }

  filter {
    name   = "tag:example"
    values = ["demo"]
  }
}
Then import its current state.
$ terraform import aws_instance.blog i-12345abcd
The last step was the configuration to change my Cloudflare DNS record to point to the new target IP address.
resource "cloudflare_record" "cf_record_blog" {
  domain  = "${var.cloudflare_zone}"
  name    = "blog"
  value   = "${data.aws_instance.blog.public_ip}"
  type    = "A"
  proxied = "true"
}
Now that the blog was hosted in AWS, I could stop it in my local home stack with docker service rm web_blog. During the change, I had my Uptime Robot monitoring working to tell me if it becomes unavailable, but everything went all right, thankfully.
Monitoring
The next day everything was still running perfectly fine, so I decided to start shutting down the rest of my home lab on my own servers. Initially I was just thinking of dropping the Elasticsearch-Fluentd-Kibana logging stack, so I went ahead and changed all the running services to use the default json-file log driver.
for SERVICE in $(docker service ls -q); do
    docker service update --log-driver json-file --log-opt max-file=4 --log-opt max-size=25m $SERVICE
done
I could now drop my whole logging stack with docker stack rm logging. When I looked at the remaining services, I realized that there wasn’t much running there anymore, mainly monitoring. I had a guess, that I could probably move most of that to AWS, and still fit them within the 1 GB memory limit I have on the EC2 instance. I copied their configuration into the new stack YAML file, then summed up the total memory limit.
$ cat stack.yml |           \
    grep memory: |          \
    awk '{ print $2 }' |    \
    sed 's/M//' |           \
    python -c "import sys; print(sum(int(l) for l in sys.stdin))"
784
This came out 784 MB, which should still be all right, even if barely. I changed the Swarm configs and secrets to simpler to manage volume mounts, then I went ahead to push the change, and redeployed the stack on the EC2 host. Everything came up nicely, so I switched the domain pointing to Grafana to the EC2 public IP, added the Prometheus data source and the dashboards I saved from the local instance.
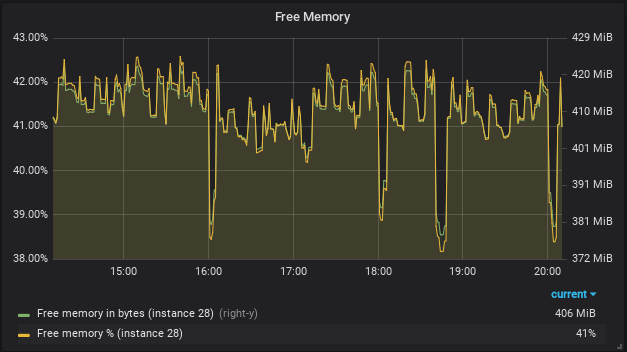
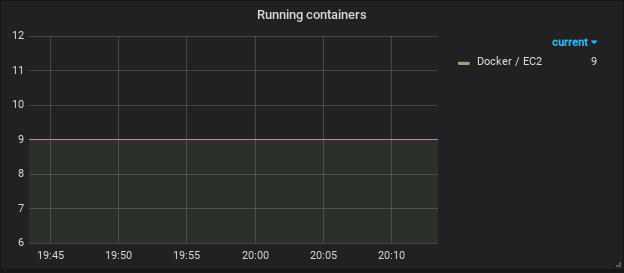
I’m also running a Node exporter there for host-level metrics, like disk space and such, plus my Release Watcher and the GitHub exporter. I realized then, that I forgot to enable TCP connections to the Docker daemon, so Prometheus couldn’t scrape it directly, I needed a work-around. I already have an image wrapping socat I could just add to the stack, pointed Prometheus to its target port, and now I had Docker engine metrics.
The only thing that went wrong here was that I forgot to get Cloudflare to bypass the cache for Grafana responses, which made it a bit difficult to log in, due to a cached redirect. Once I added a page rule, everything was working as expected.
Conclusion
I also added some additional Terraform configuration to support a slightly different redirect endpoint, dealing with my Githooks install script URL for example, but at this point, it was mostly a copy-paste job of the existing Lambda & API Gateway .tf files.
Hopefully, this story could help you if you’re looking to do a similar move perhaps, switching from a purely Docker-based configuration to Terraform, or setting up HTTP-accessible services in AWS. If you have any questions or feedback about this setup, find me on Twitter or leave a comment below! Thank you!