Home Lab - Swarming servers
This third post in the series explains how I extended my stack to multiple servers with Docker Swarm.
Quick recap
In the previous post, we have brought up a small ARMv8 server running Armbian and installed Docker on it. We also had a look at configuring multiple services on a single box using docker-compose, and I showed a very simple pipeline for automatically deploying changes and new applications from a version controlled repository where the configuration lives for them.
This works for a handful of applications, but what happens when you need to scale out to multiple servers to have enough resources for all your services?
Docker Swarm
If you like how you can define configuration for your services with docker-compose, you’re going to love Docker Swarm! You can use a very similar YAML description for the whole stack with additional features for deployment logic and configuration management. The concept of a service is much more emphasized than in Compose. Each service encapsulates a number of tasks that will be scheduled on nodes in the cluster. The orchestration and lifecycle management is all done for you, you just need to take care of the configuration.
Let’s start with setting up the servers first. To start with, let’s assume we have 3 boxes with the same CPU architecture, running Linux and they all have Docker installed already. Pick one leader and make the other two worker nodes.
For this post, we’ll imagine
amd64hosts with the IP addresses192.168.2.1,192.168.2.2and192.168.2.3, with the first being the leader.
Log in to the first box and initialize the Swarm.
$ docker swarm init
Swarm initialized: current node (jbrvijh5o4ae9gss5u3st2p45) is now a manager.

To add a worker to this swarm, run the following command:

    docker swarm join --token SWMTKN-1-36p88rlrr6aqf64fdrvknnphs803sea9k8ia7ygkcz5d29m129-894eqkdgadkr3ebnhprv0hmpt 192.168.2.1:2377

To add a manager to this swarm, run 'docker swarm join-token manager' and follow the instructions.
This activates Swarm mode in the local Docker engine. You can still run standalone containers or use docker-compose if you want to, but now you can also create Swarm services. If the host has multiple network interfaces, you may need to add the --advertise-address 192.168.2.1 flag to the initialization command as well. Get the join token from the output of your command and execute it each of the worker nodes. It looks something like this:
$ docker swarm join --token SWMTKN-1-36p88rlrr6aqf64fdrvknnphs803sea9k8ia7ygkcz5d29m129-894eqkdgadkr3ebnhprv0hmpt 192.168.2.1:2377
This node joined a swarm as a worker.
Don’t worry if you lost the initial output message from the leader, you can get it again by executing docker swarm join-token worker on its host. The join command registered the new nodes in the cluster and now they are ready to take new tasks and updates. Quickly check that everything is as expected by running this on the leader node:
$ docker node ls
ID                            HOSTNAME            STATUS              AVAILABILITY        MANAGER STATUS
jbrvijh5o4ae9gss5u3st2p45 *   leader              Ready               Active              Leader
jtlbeh4u0c4krega1u2agyifh     worker-1            Ready               Active
ffkef7x4l1njjxeinxqy6zwwd     worker-2            Ready               Active
So far so good, the 3 nodes all show up and one of them is a leader. The recommendation is to have odd number of leaders, because scheduling and cluster management needs consensus through Raft and even numbers of leaders might be split about the current state of things.
Deploying stacks
If you’re familiar with docker-compose already, then deploying a group of services as a Swarm stack will feel very similar. You can use the same YAML format to describe the services, their settings and configuration. Let’s look at an example!
version: '3'
services:

  traefik:
    image: traefik
    command: >
      --web -c /dev/null
      --docker --docker.swarmmode --docker.domain=docker.localhost
      --logLevel=DEBUG --accessLog
    deploy:
      placement:
        constraints:
          - node.role == manager
    labels:
      - 'traefik.enable=false'
    networks:
      - apps
    ports:
      - '80:80'
      - '8080:8080'
    volumes:
      - /var/run/docker.sock:/var/run/docker.sock:ro
      - /dev/null:/etc/traefik/traefik.toml

  ping:
    image: python:3-alpine
    command: |
      python -c "
      import socket
      from http.server import HTTPServer, BaseHTTPRequestHandler

      class Handler(BaseHTTPRequestHandler):
          def do_GET(self):
              self.send_response(200)
              self.end_headers()
              self.wfile.write(bytes('Pong from %s\\n' % socket.gethostname(), 'utf8'))

      HTTPServer(('0.0.0.0', 8080), Handler).serve_forever()
      "
    networks:
      - apps
    deploy:
      mode: global
      labels:
        - 'traefik.port=8080'
        - 'traefik.docker.network=demo_apps'
        - 'traefik.frontend.rule=PathPrefixStrip: /ping'

  hello:
    image: python:3-alpine
    command: |
      python -c "
      import socket
      from http.server import HTTPServer, BaseHTTPRequestHandler

      class Handler(BaseHTTPRequestHandler):
          def do_GET(self):
              name = self.path.split('/')[-1].capitalize()
              self.send_response(200)
              self.end_headers()
              self.wfile.write(bytes(
                  'Hello, %s! (from %s)\\n' % (name, socket.gethostname()), 'utf8'
              ))

      HTTPServer(('0.0.0.0', 8080), Handler).serve_forever()
      "
    labels:
      - traefik.port=8080
      - traefik.docker.network=demo_apps
      - "traefik.frontend.rule=PathPrefixStrip: /hello/"
    networks:
      - apps
    deploy:
      replicas: 2
      labels:
        - 'traefik.port=8080'
        - 'traefik.docker.network=demo_apps'
        - 'traefik.frontend.rule=PathPrefixStrip: /hello/'

networks:
  apps:
We have a few things going on in here, let’s start with the Python services. They are both simple HTTP servers that respond to GET requests with a fixed message and their hostname.
I love how simple but powerful Python is. Using only standard libraries we have a simple HTTP endpoint in about 15 lines. Just awesome!
Sure, this is not a production-ready server or production-quality code, but I find it amazing how easy it is to code something like this up in Python for demonstration purposes, for example. Anyways, back to our stack!
The third service is an awesome, modern reverse proxy, called Traefik, which was built with dynamic backends in mind from the start. This makes it perfect for routing traffic to services running in containers that may come and go all the time when their configuration changes, for example. Traefik is super powerful and there are lots of nice things built into it (like HTTP/2 support, automatic SSL with Let’s Encrypt, metrics support, etc.), but for this post, it’s enough to know that it can read state information from Docker and adjust its routing configuration automatically based on metadata.
Make sure to check out their excellent documentation if you’d like to know more about Traefik!
In our example, requests to /hello/<name> will be handled by the hello service and requests to /ping will be served by tasks of the ping service. This is configured for Traefik through the traefik.frontend.rule labels defined in the YAML file.
It is time to deploy our stack now! Save the above as stack.yml and execute:
$ docker stack deploy demo -c stack.yml
Creating network demo_apps
Creating service demo_hello
Creating service demo_traefik
Creating service demo_ping
The command above has created the services and the new overlay network (demo_apps) for them.
Services in Swarm stacks are prefixed with the name of the stack. Some configuration will need this (
demo_in our example).
Let’s check the status of the services! Eventually it should look like this:
ID                  NAME                MODE                REPLICAS            IMAGE               PORTS
b216o19ezj6v        demo_hello          replicated          2/2                 python:3-alpine
kjoq3qy9ahqu        demo_ping           global              3/3                 python:3-alpine
dk0d1lcv98l5        demo_traefik        replicated          1/1                 traefik:latest      *:80->80/tcp,*:8080->8080/tcp
All containers started by the tasks will be attached to this network where they can talk to each other using service names as hostnames, even if they are running on different physical hosts, pretty cool! Overlay networks are neat, check out the documentation on the link if you’re interested to know more about them. The containers also get their own unique IP addresses on this network and as they start up, Traefik will add routing to them using these addresses. You can see this on a nice dashboard at the http://localhost:8080/dashboard/ URL.
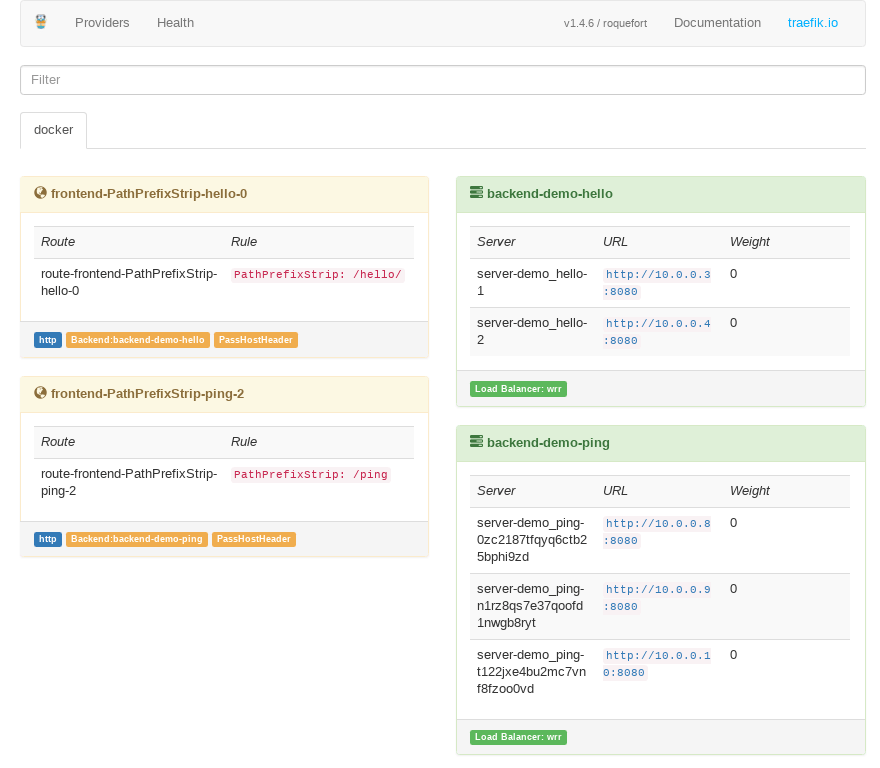
We can also interact with services in the stack using simple docker commands, like these:
# Create a new service, called `sample`, and expose its internal port 8080 as 8001 on the host
$ docker service create --name sample --replicas 2 --publish 8001:8080 python:3-alpine python -m http.server 8080
iui2kz9ibjs0mfp2vlkephvb2
overall progress: 2 out of 2 tasks
1/2: running   [==================================================>]
2/2: running   [==================================================>]
verify: Service converged
# List our current services
$ docker service ls
ID                  NAME                MODE                REPLICAS            IMAGE               PORTS
iui2kz9ibjs0        sample              replicated          2/2                 python:3-alpine     *:8001->8080/tcp
# List the tasks of the `sample` service
$ docker service ps sample
ID                  NAME                IMAGE               NODE                DESIRED STATE       CURRENT STATE                ERROR          PORTS
tsvsflowxsow        sample.1            python:3-alpine     leader              Running             Running about a minute ago
mlwjcarcph7l        sample.2            python:3-alpine     worker-2            Running             Running about a minute ago
# Remove the `sample` service and its tasks
$ docker service rm sample
sample
OK, back to our demo stack! Let’s try hitting our services with a few request! You should get something like this:
$ for i in {1..5}; do curl -s http://localhost/ping ; done
Pong from 17ddc60169df
Pong from f2980ab861d8
Pong from 7d3bf269a621
Pong from 17ddc60169df
Pong from f2980ab861d8
$ curl -s http://localhost/hello/world
Hello, World! (from abe7c17b92bc)
$ curl -s http://localhost/hello/viktor
Hello, Viktor! (from 407237d6b729)
You can see that the requests were distributed across different instances of our services. ping was configured as a global service, meaning it has one tasks scheduled for every node in the cluster, while hello has two replicas scheduled to any of the nodes. You can see where they are exactly using the docker stack ps command.
$ docker stack ps demo
ID                  NAME                                  IMAGE               NODE                DESIRED STATE       CURRENT STATE                ERROR               PORTS
0zc2187tfqyq        demo_ping.ffkef7x4l1njjxeinxqy6zwwd   python:3-alpine     worker-2            Running             Running about a minute ago
t122jxe4bu2m        demo_ping.jtlbeh4u0c4krega1u2agyifh   python:3-alpine     worker-1            Running             Running about a minute ago
n1rz8qs7e37q        demo_ping.jbrvijh5o4ae9gss5u3st2p45   python:3-alpine     leader              Running             Running about a minute ago
phvk48hy6h5b        demo_traefik.1                        traefik:latest      leader              Running             Running about a minute ago
dez933di9o4m        demo_hello.1                          python:3-alpine     worker-1            Running             Running about a minute ago
kclnyekyym5e        demo_hello.2                          python:3-alpine     leader              Running             Running about a minute ago
You can also notice that the Traefik container is always running on the leader node. This is done by the constraints defined on the service and it is necessary, so that it has access to the tasks information using the Docker API. It also needs a connection to it, this is why it has the /var/run/docker.sock bind-mounted to it.
Sharing is caring?
If you used docker-compose, you know how easy it is to share files or folders from your host with the containers. When running tasks spanning multiple nodes in the Swarm cluster, things could get a little bit trickier.
Let’s get our YAML file a bit cleaner by extracting the inline Python code into its own file and mounting it back to the services. You can find it in my GitHub repo, but it’s pretty much the same what we had inlined above. We can now change the service configuration to use the sample_http_server.py, like seen below, right? Well, not necessarily…
...
  ping:
    image: python:3-alpine
    command: /app/server.py --ping
    volumes:
      - ./sample_http_server.py:/app/server.py
...
The problem with this is that the ./sample_http_server.py will be expanded to an absolute path on the leader node. If a task of the service gets scheduled to another node, it will expect the same file to exist at the exact same absolute path on the host. What can we do then?
You could make sure the necessary files or folders exist on all nodes individually. This might work OK if you’re only mounting in read-only mode, but you’d still need to update the files on the host in multiple locations, which is not cool.
Mount from a shared directory
You could create a shared directory and mount it with NFS as read/write on all nodes under the same path. This way containers running on any of the nodes should be able to write data there and read it, even if the task gets rescheduled to another node. I said it should work because you can run into file permission issues pretty quickly. You might have different uids and gids on the individual nodes that might map differently on NFS. This is what seems to work for me, more or less:
/var/shared/folder 192.168.2.0/24(rw,fsid=0,sync,crossmnt,no_subtree_check,all_squash,anonuid=1000,anongid=1000)
The unknown users (like ones that only exist inside a container) will be mapped to a known, existing uid and gid. I’m still having issues with some my services not being able to share these directories from all the nodes, but I think it’s to do with how my setup has evolved and not necessarily with this method, YMMV.
...
  ping:
    image: python:3-alpine
    command: /app/server.py --ping
    volumes:
      - /mnt/shared/sample_http_server.py:/app/server.py
...
The service configuration in the YAML would look something like the above. You’ll also have to make sure that the shared folder exists on all servers, so it means a bit of manual setup when adding a new node to the cluster, which is not awesome.
NFS service mounts
I’ve recently learned that Docker also supports NFS mounts natively. This is very similar to the option above with one important distinction. You can declare your NFS mount targets on the containers and that means, the mount doesn’t have to exist on the host. Note that the kernel still has to support NFS and the hosts have to have the required libraries installed, nfs-utils for example for Debian based systems.
...
  ping:
    image: python:3-alpine
    command: /app/server.py --ping
    volumes:
      - type: volume
        source: remote-folder
        target: /app
        read_only: true
        # if you don't want the contents to be
        # copied into a new folder for the volume
        volume:
          nocopy: true
...
volumes:
  remote-folder:
    driver: local
    driver_opts:
      type: nfs4
      device: :/shared
      o: addr=192.168.15.25,rsize=8192,wsize=8192,timeo=14,intr
Now, as long as the target share is available, we can start containers using files from there. If the share goes away though, it’s bad luck for your services.
Configs and secrets
Another option worth mentioning for read-only files, like webserver configuration, that you know when the containers start and can only be updated if the related service is updated too. Docker service configs allow you to save data (text or binary) in the Swarm cluster and mount it in containers as a file.
...
  ping:
    image: python:3-alpine
    command: python /app/server.py --ping
    configs:
      - source: server_main_module
        target: /app/server.py
        mode: 0440
...
# this top level mapping defines the
# available configs for this stack
configs:
  server_main_module:
    file: ./sample_http_server.py
  # this one below has to exist already
  # and it won't be managed by this stack
  existing_config:
    external: true
Service secrets are defined in a similar way (generally just a change from configs to secrets), but Swarm will also encrypt these. Be aware that both configs and secrets are immutable, so you won’t be able to update them. You can also not delete them as long as they’re in use by at least one service.
You can sort of update a service config by using a different name for it:
$ echo 'Updated Config' | docker config create svc-config-v2 -
qym8cxseaek74w8uq4ukq8yqc
$ docker service update some_service --config-rm svc-config-v1 --config-add svc-config-v2 --detach=false
some_service
overall progress: 1 out of 1 tasks
1/1: running   [==================================================>]
verify: Service converged
$ docker config rm svc-config-v1
svc-config-v1
Storage drivers
Docker’s plugin system allows registering additional volume drivers along with the ones built-in. You can, for example, bind a volume to an S3 bucket or a NetApp share. Check out the documentation to see what’s available, or search on GitHub for other open-source implementations. Depending on your use-case, you might find people having the same problem where they already solved it in a reusable way.
Let’s look at a small example for CIFS shares, using the Netshare plugin. We’ll grab the binary, start the plugin and start a container using it.
$ wget -O /usr/local/bin/docker-volume-netshare https://github.com/ContainX/docker-volume-netshare/releases/download/v0.34/docker-volume-netshare_0.34_linux_amd64-bin
$ chmod +x /usr/local/bin/docker-volume-netshare
$ sudo docker-volume-netshare cifs &
# the plugin should be running at this point
$ docker run --rm -it \
    --volume-driver cifs \
    -v 192.168.15.25/Shared:/mnt/shared:ro \
    alpine ls /mnt/shared
hello.txt remote_file.dat
This can easily be adapted for Swarm services as well.
Updating stacks
If you’re switching from a Compose CD workflow to Swarm, the easiest change would be executing docker stack deploy instead of docker-compose up. Be aware though, that this may cause your services to reschedule their tasks on every invocation, which might mean container restarts. Make sure you have a sensible update-config if you go for this. Better yet, make sure you have one in any case!
I’ve opted to use webhooks as triggers for updates on my stack. I have a set of webhook-proxy applications running in my Home Lab, one is available externally, that validates the requests and posts them to another, internal instance, that also have access to the Docker engine through the API. The latter is the instance where the main update logic is implemented.
When I update the stack YAML or a configuration file in a private BitBucket repo, it sends a webhook request that will trigger these main steps:
- Update files with
git pull - Restart services using config files that were updated
- Docker stack deploy
There are a couple more bits and pieces in the actual pipeline but this is the main logic. Very similar to the docker-compose + cron way, but instead of constantly checking from Git, we just wait for the external service to signal us the change.
I also have a workflow for Docker image updates on my Docker Hub account. When a new image is pushed and a webhook is posted, a webhook-proxy handler will:
- Pull the image
- Compute the image hash
- Update services using the image to this version
The command line equivalent would be something like this:
$ docker service update some_service --image some/image:latest@sha256:<sha-hash>
You can see an extract of these here, in the webhook* files, that can give you a better idea of what is going on.
Wrapping up
Hope you enjoyed this rather lengthy walkthrough of using Swarm services instead of local Compose projects!
In the upcoming posts we’ll look at auto-configuration of services and also monitoring and logging.
All the parts so far: