Building and shipping open-source
Let me walk you through the continuous integration workflow I use to prepare my applications for deployment and all the wonderful free for open-source services involved.
This post reflects my current personal preference for some hosted services. If you have anything against any of them, you can find an alternative easily with similar features. I found these fairly easy to work with, so if you’re undecided, you can give them a go!
GitHub
You’ll have probably heard of this one already. I keep my open-source projects in GitHub, which the obvious place for them. You can’t look for source code hosting without even considering it. There are good alternatives out there but GitHub is one of the most awesome providers.
It has lots of existing integrations with various systems. This is completely understandable when you have such an extensive and easy to use API, so you can roll your own integration easily. GitHub also allows you to configure webhooks to trigger on changes. These are great to kick off automated pipelines or to handle them in any other way you want. It is a simple HTTP request with JSON payload, so what you can do with that request is only limited by imagination.
In some of my projects I use a git pre-commit hook to run linting or smoke tests on the application. It would tell me if there is an obvious mistake in the change I’ve just done.
The fastest feedback you can get is before you even commit the change.
Really. You can’t beat this. Even if your CI pipeline runs your tests and emails you the results in seconds or minutes, this is faster by a long mile. All you need to do is creating a file at .git/hooks/pre-commit to execute whatever you’d like before the commit happens.
# make sure there aren't any localhost references left in the code
grep -ri 'localhost' src/ | grep -iE '\.(py|js|css):' > /dev/null
if [ "$?" -eq "0" ]; then
    echo "There are references to 'localhost' in the code"
    grep -nri 'localhost' src/ | grep -iE '\.(py|js|css):' | grep --color 'localhost'
    exit 1
fi

# make sure the tests are passing
PYTHONPATH=src python -m unittest discover -s tests -v
if [ "$?" -ne "0" ]; then
    exit 1
fi
When this script executes and returns with a non-zero exit code, your commit will be aborted. It only takes as long as the tests themselves to know if you’re going to break something, so make sure the smoke tests are fast.
This file is best checked in into your git repository, so you can reuse it when moving to another machine. The contents of the .git folder are not submitted to GitHub though, so you would have to place it outside of that and symlink it back with something like this:
$ ln -s ../../.pre-commit-sh .git/hooks/pre-commit
Now the only thing you have to remember on a fresh clone is to set up the symlink again. I’ll leave it up to you to figure out how to automate this part.
The git pre-commit hook is not a GitHub feature but I thought it’s worth mentioning.
Travis CI
Did you know that there are companies out there who are happy to take your source code and build it for you for free? Travis CI is one of them and it is absolutely brilliant, plus it’s free for open-source!
Getting started with it couldn’t be any easier: you can sign in with your GitHub account. This will reuse your user handle from there and also installs the necessary integration into your account to trigger new builds for changes on projects that are enabled in Travis. To get one built automatically, you just need a .travis.yml file at the top-level folder.
language: python
python:
  - '3.6'
script:
  - python -m unittest discover -v
This minimal example will get your project tested on Python version 3.6 and notify you in an email if any of the tests fail. If you also want get a coverage report printed out on every build, you can use the coverage module easily.
language: python
python:
  # test it on two different Python versions
  - '2.7'
  - '3.6'
install:
  # install dependencies
  - pip install -r requirements.txt
script:
  # python tests
  - python -m coverage run --branch --source=src -m unittest discover -s tests -v
  # coverage reports
  - python -m coverage report -m
This time, a single change will kick off two builds for the different Python versions, install the requirements (which would happen anyway, Travis has that same instruction as its default install step) then executes the unit tests through the coverage module and prints the results in a human readable format like this.
$ python -m coverage report -m
Name         Stmts   Miss Branch BrPart  Cover   Missing
--------------------------------------------------------
src/app.py      47      2     10      1    95%   82, 86, 85->86
Pretty neat, but you can do so much better!
Code quality
There are a couple of good free for open-source services for code quality checks and visualization. I use Coveralls and Code Climate - they’re both fantastic.

You can sign up for both of them using your GitHub account. Coveralls gives you code coverage metrics and nice graphs for them. You can install their module using pip and make it part of your build to submit the report to them.
language: python
python:
  - '3.6'
install:
  - pip install -r requirements.txt
  # get the reporter for Coveralls
  - pip install coveralls
script:
  # python tests
  - python -m coverage run --branch --source=src -m unittest discover -s tests -v
  # coverage reports in XML format
  - python -m coverage xml
  # submit the reports
  - coveralls
It doesn’t need any special settings, the report will be linked to the GitHub project building in Travis - awesome! You do need to enable the project in Coveralls first.
Code Climate also does code coverage but it also includes static code analysis. You can get details about issues like code duplication, too much cyclomatic complexity, too long functions, etc.
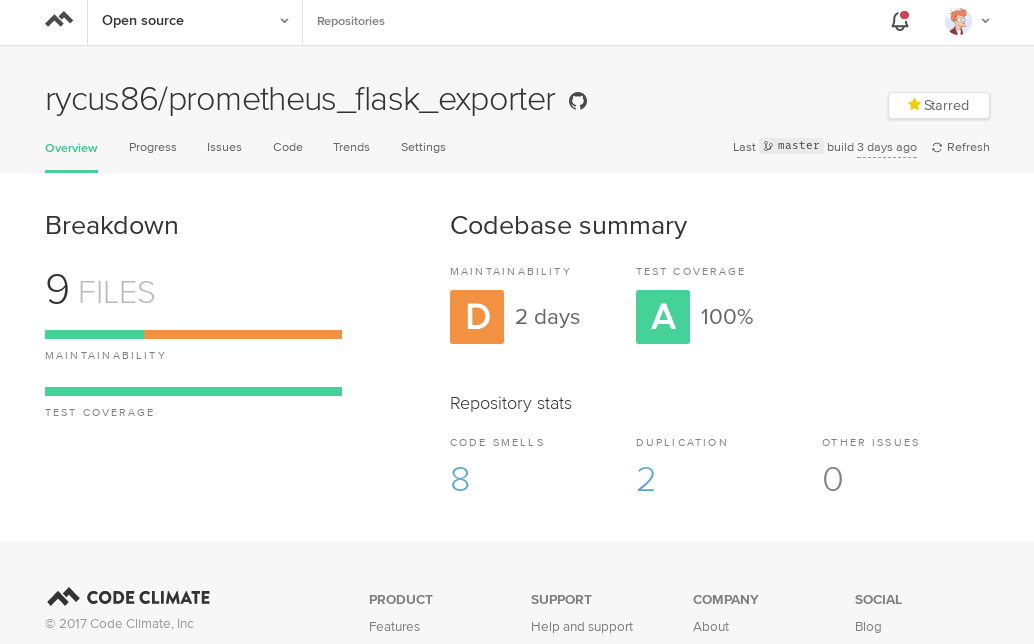
Getting their reporter is a bit more work but it’s not difficult. You need to grab a binary for it, make it executable and have the CC_TEST_REPORTER_ID environment variable ready with the ID you can find in the settings section in Code Climate.
language: python
python:
  - '3.6'
install:
  - pip install -r requirements.txt
  - pip install coveralls
  # get the reporter for Code Climate
  - curl -L https://codeclimate.com/downloads/test-reporter/test-reporter-latest-linux-amd64 > ./cc-test-reporter
  - chmod +x ./cc-test-reporter
script:
  - python -m coverage run --branch --source=src -m unittest discover -s tests -v
  - python -m coverage xml
  # submit the report
  - coveralls
  - ./cc-test-reporter after-build --exit-code $TRAVIS_TEST_RESULT
env:
  # just an example, configure it in Travis to hide it, OK...?
  - CC_TEST_REPORTER_ID=abcdef1234
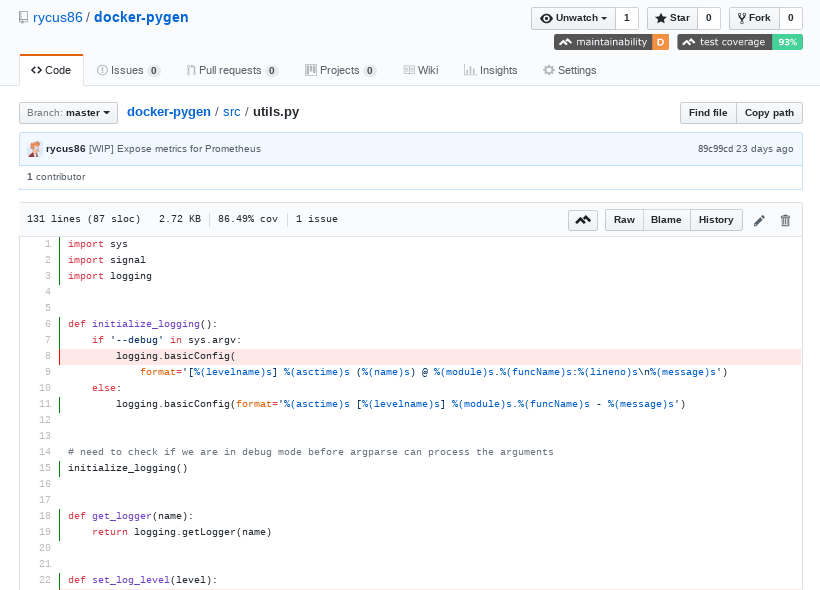
Code Climate has a handy Chrome extension you can install that transforms your GitHub repository to allow displaying code issues and lines missed while testing. It’s super convenient to be able to see this information on the repo without having to go to another site.
Finally, I’d like to mention flake8 which is a modular source code checker I’ve come across in the docker-py project I’ve contributed to. It can save you from the embarrassment of committing code that doesn’t adhere to the common coding style used by the project. The best way to ensure this happens is to run it as part of the git pre-commit hook.
Advanced Travis CI
Let me go back to Travis briefly and introduce some of the features I’ve found very useful. Using these completely depends on the project and the use-case and there are many alternative ways to implement good pipelines.
Build matrix
Let’s assume we want to build our application for different versions of Python, or test it on different versions of Java, or execute the tests with different configurations. Travis has a pretty nice feature, called Build Matrix. It takes the different values for the same setting and runs a build for every combination of them.
language: python
python:
  # test on 3 different Python versions
  - '3.6'
  - '3.4'
  - '2.7'
script:
  - python -m unittest discover -v
env:
  matrix:
  - SLOW_TESTS=true
  - SLOW_TESTS=false
This configuration would generate six builds for a single change and run the tests including/excluding the slow tests on each Python version. I used to use this to build Docker images for platforms with different CPU architectures. I have found a better way since.
Build stages
Though still in beta, Build Stages is a super powerful way of speeding up your build and separating each major logical step better. From the documentation:
Build stages is a way to group jobs, and run jobs in each stage in parallel, but run one stage after another sequentially.
This allows you to have a different stage for unit testing, integration testing and deployments for example.
language: python
python:
  # the build stages will use the first value
  # as the default (3.6 in this case)
  - '3.6'
  - '3.4'
  - '2.7'

# this is the default "script" step unless overridden
script:
  - python -m unittest discover -v

# further stages after the main "test" build stage
jobs:
  include:
    # template for an integration test stage
    # (this also generates a job)
    - &integration-stage
      stage: integration
      # install different modules for this
      install:
        - pip install -r integration-requirements.txt
      script:
       - pip -m unittest discover -v -p it_*.py
      env:    API_VERSION=2

    # run the same stage with different configuration
    - <<: *integration-stage
      env:    API_VERSION=3

    # a final deployment stage
    - stage: deploy
      # only deploy from the master branch
      if: branch = master
      # do not run the pip install now
      install: skip
      script:
       - ./run_deployment.sh
This generates three stages with the first running three jobs then - if this is successful - the next stage runs integration tests for two different versions of an API in parallel and finally, the project is deployed with the help of a Shell script perhaps. Jobs can have conditions like the example has for deployments - we might not want to deploy from branches or pull requests.
Build Stages do not keep the files generated by the build between stages; check out the Travis documentation on how to do this if you need it!
I use similar pipelines to build, test and deploy my projects that interact with Docker and I make sure to test them on different Docker versions. These builds need a little extra though.
Using Docker on Travis
By default, your Travis builds are running in Dockerized build environments, e.g. in containers. This is pretty awesome as these containers have a considerably shorter startup time than virtual machines for example. This is the default setting and you should use it as much as you can. If your build however needs root permissions or execute docker commands then you’ll need to ask Travis for a virtual machine instead.
# this enables sudo and docker commands
sudo: true
# the rest of your configuration as usual
language: python
python:
  - '3.6'
...
Expect your build jobs to start a bit slower and potentially do a bit more setup than the ones running inside containers but if you need it, it’s an easy configuration.
Deployments
If you are building Docker images and uploading them to Docker Hub, then your deployment stage might look like this:
...
jobs:
  include:
    - stage: deploy
      if: branch = master
      script:
        - docker build -t rycus86/hello-world .
        - docker login -u="rycus86" -p="${DOCKER_PASSWORD}"
        - docker push rycus86/hello-world
You could also wrap this in a Shell script if that is more convenient for you. Make sure to define the environment variable for the password either in the project settings in Travis or in the .travis.yml file encrypted with the travis-cli tool. If you don’t feel like installing it, don’t worry, I have a Docker image for it.
Travis also has support for deploying to major package managers. This makes it super easy to deploy to PyPI with a few lines for example and let Travis install everything that is needed to make it happen.
...
    deploy:
      provider: pypi
      user: rycus86
      password:
        secure: Th3Secur3_p4$$w0rd
      # deploy only when building a git tag
      on:
        tags: true
Skipping a build
Sometimes you want to push some changes to GitHub that you know would fail on Travis. But you’re on the train hacking away on the code using vim and your stop is almost here, you need to back your code up. Or maybe you only fixed a typo in the README and you don’t want to waste Travis’ precious resources.
To get Travis to ignore the changes and skip the build, simply include [ci skip] or [skip ci] anywhere in the commit message.
Bonus: Badges
After your hard work on your open-source projects and countless rebuilds on Travis to fix failing unit tests, you want nothing more than to proudly display that your build is passing, your code coverage is great and Code Climate thinks your code is not unmaintainable - not completely at least. You can add badges to your README that will always reflect the latest status of your project.
| Service | Badge |
|---|---|
| Travis |  |
| Coveralls | |
| Code Climate |  |
| PyPI |  |
| PyPI |  |
To find more types of badges related to open-source and free services, check out the amazing Shields.io!